Thistle Dew…

Thistle Dew

This’ll Do.

That little phrase… a play on words, really…
first gave a name to our little farmette,
and then to our business.

That phrase had connotations of contentment,
of making do, of being satisfied, of just enough…
of a Goldilocks sort of not too big, not too small,
not too hard, not to soft, not to hot, not too cold…

…Just right.

Thistle Dew was a balance our family was seeking, of living life at a speed in which we could enjoy the moments. A merry-go-round that was moving along at a good pace, but going slowly enough that you could step off from time to time without fear of injury. Where you could grab a friend and jump back on for a bit of fun, walk around on the ride and choose a different horse, and even wave and talk to those on the ground.

Somewhere along the way, the merry-go-round
morphed into a dizzying tilt-a-whirl.

Activities became obligations and our calendars filled to the brim. Every day held something important… sometimes several somethings. The To-Do List was growing by leaps and bounds and seemed to be taking on a life of its own. At the same time, our closets and cubbies and attic and under-the-beds became over-stuffed and overflowing. We multi-tasked and scheduled and organized and pedaled as hard and as fast as we could, but eventually realized we were getting tired of the too much and needed the just enough again.

Just enough for what really matters…

Family

Friends

Angels Unaware

A while back, we realized we needed time to laugh and drink tons of coffee and hold little hands and take naps and bake cookies and just plain be. We began the process of clearing clutter and our schedules to make some space for real living, as well as the possibility of new and exciting adventures. We wanted to be able to say “Yes” to the right things instead of “Sorry… there’s no room… I don’t have time…” Not that our lives would not be sometimes hectic or that we would reach some sort of slow living utopia, but so we would have time to breath and enjoy life.

Last year, I chose “Home” as my one word for 2013. Looking back, I think focusing on Home, and everything it meant to us, was an important step in us getting back to just enough….

…to “this’ll do.”

Thistle Dew…

…My new/old One Word/Phrase for 2014

Snipping

In the Best of Company….

Since 2008, we have been very privileged
to be part of an incredible group of
Traditional American Folk Artists…

Tags

We have met so many of them in person over the years
at period craft fairs, and also through our family’s store…

… And they truly are a wonderfully down-to-earth group of folk artists.

2013Tag

And we’re always amazed that we can be included.

2012DirectoryLogo4C

Thank you, Early American Life Magazine
for giving so much encouragement and support
to Traditional American Artists!

Makeover…

Okay.

So, the May issue of Country Living Magazine was my favorite issue EVER.

I’m not kidding.

Chalkboards and maps and globes and typewriters and
filing cabinets and drawers with labels and birdhouses
and paperclips and postcards and suitcases and desks…

…all the weird things I pick up in antique shops
and how to put them together in a room!

I had barely put that issue down when my Mom called and said
Lavender and Lace,
the antique shop just down the road from us,
had something that I seriously needed to see.

So I went, I saw, and I bought it.

FileCabinet

A mid-century, well-worn, awesomely aqua filing cabinet…
…very much like the one on the cover of the May issue of CL mag!

I’m guessing it was from a small museum in West Virginia…

Stems

It had been used for storing nature objects and fossils…

Fossils

… but now needed a bit of TLC.

CloseUp

So, Hubby made some new drawer bottoms…

Drawers

… And I removed the hardware…
…Very Carefully… it was old, fragile plastic.

Hardware

I managed to pry off the hard rubber logo from the top… also very fragile!

Brand

We had a little black spray paint left from a previous project…

Paint

… and it took a little thoughtin’ to figure out how to paint the brass nails…

Nails

… and it worked perfectly!

PaintNails

I gave the drawer fronts a few coats of fresh aqua paint…
…left over from the upstairs bedroom remodels!

UpClose

And now it’s ready to fill with all sorts of Art Room Stuff!

Finished

Nothing like a little inspiration and some leftover paint!

MagazineCover

This Week…

Haven’t had much time to write, but have been keeping my hands busy lately!

So, just a few photos from this week…

FramesIt began with frames and yellow paint…

GrainingAnd then some brown paint…

MoreFramesAnd then some more frame parts took over the dining room…

(And laundry too…
…a basket of folded clothes decided to make an online appearance!)

Details

And there were LOTS of little details!

photo

We even got to spend a few hours holding little hands!

🙂

And there was sustenance in the form of Raisin Bran Muffins…

DSC_0016

I am always amazed when making this recipe
that was a staple of Hubby’s Mom’s kitchen…

DSC_0012

The bowl is filled to the brim with the initial ingredients…

Muffins

…and then you’re supposed to stir in a box of of Raisin Bran cereal!

DSC_0016

And somehow it fits!

DSC_0018And there are plenty to share… The batter can keep in the fridge for up to 6 weeks!

(Great to have on hand for Instant Hospitality!)

It’s amazing what can be accomplished with a pot of coffee on the back burner
and a stash of fresh, yummy Raisin Bran Muffins!

Grammy’s Raisin Bran Muffin Recipe…
(Originally from Kellogg’s, I think!)

Mix together 1 cup oil, 4 eggs, & 3 cups sugar in your largest bowl.
In a medium bowl, sift together 5 cups of flour & 2 tsp. baking soda.
Mix dry ingredients into wet ingredients, alternating with 1 quart buttermilk.
(You will need the entire quart!)
Once the buttermilk, oil mixture, and dry ingredients are well mixed,
Stir in 15 oz. Raisin Bran cereal.

Bake muffins @400° for around 15-20 minutes.
(They should be golden brown, and not smooshy on top.)

Keep extra batter in fridge for up to 6 weeks…
…but I’ll bet it won’t last that long, they’re so yummy!

🙂

You can play around with this recipe…

Mix up your flours… white, whole wheat, spelt, oat?

Use brown sugar?

Add in some nuts or seeds?

Also… I never seem to have the correct size Raisin Bran box, so I look at the serving
size on the side and do a bit of math to figure out how many cups are needed.
This store-brand cereal ended up being 7 ½ cups for 15 oz.

I usually use between 7 & 8 cups.

A Place for Everything…

A place for everything,
And everything in its place.

That is one of my life goals.

Obviously, I still have some work to do.

After a busy Fall season, my desk is a mess…

MessyDesk

And our Work Table is even worse…

MessyTable

I usually do NOT show “Before” pictures, but thought you might
like to know that being an artist is not all Glitz and Glam.

Though… if you look really close, you’ll see there actually is quite a
bit of “glitz” on the table, stuck to things it’s not supposed to be stuck to.

It’s even stuck to me…. My nose, forehead, hands, shoes, etc.

😀

Creativity is not necessarily tidy.

BUT… I do like order, when I can manage to achieve it! I’m still working to find the perfect place for everything, and having a spot to put things away helps when the clean-up process begins. You can make a huge dent in a big mess when there’s an easy-to-use organizational system. I keep looking for really cute, vintage-y ways to organize in the art room. Drawers are my favorite, since all you have to do is open them up and drop things into them…

FramingSupplies

WaxPaper

LittleDrawers

Jars are a favorite too…
These get shuffled around quite a bit, as I grab a jar of color!

Watercolor pencils on the top shelf,
Prismacolors on the bottom.

MyRainbow

The green bread box below is filled with small tools.
Patterns in the red “Martha” binders.

There’s even a small jar in the hutch filled with kitty whiskers.

I thought they might come in handy some day.

You never know.

PencilsTools

And every studio needs some “Flat Storage.”
This old fridge comes in handy to keep larger items safe.

FlatStorage

And smaller papers have a place to be as well…

PaperStorage

Now, if I could just learn to “clean as I go” when working on art!

“After” pictures coming another day…

Moving into December!

Well, I didn’t quite finish the Pie from Scratch series in October… or in November… but have decided that I will save those last few posts for later. November orders, a couple of shows, and preparing Christmas designs have taken their toll on me! I am still working on the book, and it got off to a great start during the 31 Days Project, so I feel that, Lord willing, it will be ready for publication in just a few months! I also learned that one should be working on a “Fall” book the Winter before… There is quite a bit of lead time needed in just the printing prep and publishing period. As things progress, I’ll stick up those last posts! I think they’ll be much better quality and have more information about making a book than if I just try to finish the posts quickly.

So… moving on…

😀

I started working on some new Christmas designs
just before Thanksgiving, with this little watercolor…

Comfort and Joy Watercolor

It’s still not finished, but it has inspired plans for a
“Comfort & Joy” Collection!

First… a paper cutting, of course…

ComfortFrameFr

There might be some more tiny Comfort & Joy cuttings,
but my thoughts are leaning toward some printed things!

Gift Tags… Notecards… Christmas Cards…

Why don’t I think of these things in August?

And, in a moment of sheer insanity,
I revisited the little cuttings for pendants…

DSC_0039

These are hand cut, hand painted, and REALLY tiny…

DSC_0042

… But they have possibilities!

DSC_0038

And they should be showing up in
our shop in the next few days!

And in other news, I bought a new toy…

DSC_0004

…Which I think might also have possibilities!

It was not supposed to arrive to arrive until next week,
and amazingly showed up LATE last night!

The UPS Guy scared the soup out of me when he knocked
on the door at that hour! He practically ran across the porch…

Thump! Thump! Thump!

Poor guy… I guess late nights are standard issue this time of year.

But alas… We have a show tomorrow and are frantically prepping.

Can’t play with it for a few days.

:-/

Come visit us tomorrow at…

Christmas in Odessa!

We’ll be in the Craft Show at the
Appoquinimink Training Center!

(Spell Check went crazy over that one!

Our girl Katie D. of
Corner Chair
will be there too!

Minding My Beeswax!

I’m working on some art credits in Painting, and really, really, REALLY wanted to find some time to try out the set of Encaustic Paints I bought this winter before submitting my portfolio for the class. I finally found a few hours to play with the paint, and thought I’d share the experience!

I read about encaustic painting last year in my art history textbook, and have been intrigued ever since. Pigment suspended in beeswax that creates luminescent paintings. The Fayum mummy portraits and early Christian icons painted with beeswax are absolutely beautiful…

Of course, I didn’t think I’d be able to come up with something that pretty the first time around! I did have somewhat of a plan for a painting, and started sketching it on the EncausticBord. I was thinking beeswax… bees… honeycomb… neat “Bee” quote.

My first thought was how to melt the wax and keep it melted. The woodstove is going, why not use it? So all the materials were quickly gathered into the living room, and I went right into “melt the wax” mode. I found out that wax melts quickly on the stove, and hardens quickly off the stove, so I spent about two hours standing within a foot of our crankin’-out-heat woodstove. It was HOT. A base coat of gold was applied with a bit of difficulty, but I got it on there. Then I tried to paint the little honeycomb pattern…

…And that wax hardened way too fast! So I pulled out the heat gun (from my rubber stamp embossing days!) and tried to melt it a bit to smooth out the glumpiness…

…And quickly created a honey-colored puddle.

😛

After that, I resolved myself to the fact that this painting would indeed be rather abstract. So, instead of being super concerned about lots of perfectionistic detail, I just enjoyed playing with the stuff. Things went a little too quickly to take pictures… and I was a bit too messy to touch a camera… but it was fun, and I actually liked the results. I outlined the honeycomb cells with a purplish color, and then dabbed on the outline of a bee. Fortunately, I had the forethought to print out the quote ahead of time, and I cut that up into pieces and melted it on. The painting still needed a little something, so I added some gold leaf flakes and iridescent ultra-fine black glitter. And then gave the whole thing a coat of melted wax with a tiny bit of color…

All in all, it was a fun project. It was relaxing to not worry about being precise. It was messy. It was sticky. It involved a frantic run for potholders at one point. It smelled HEAVENLY. At least until I melted a plastic lid on the woodstove. I’ll try it again… and will be prepared next time around.

A Small Token…

I’ve been working on this year’s Valentine designs, and thought I’d share with you the process of doing a papercutting from start to finish! It takes a bit of inspiration to get ideas for a historic-style papercutting. I usually spend a few hours going through reference books on early fraktur. I rarely do exact reproductions of historic pieces, but instead, try to get a feel for the layout of antique papercuts. I’ll also doodle a bit, trying to create birds and flowers that look like they were drawn a couple hundred years ago. And, I’ll read through the translations of the German sayings to find an inspiring phrase or verse.

The Gift is Small, The Love is Great is one of my favorite resources for Pennsylvania German fraktur. It focuses on small works of art, such as the Vorschrift (writing samples), Book Plates, and Rewards of Merit that teachers once gave to their students. The Gift is Small also includes little love notes and tokens of remembrance given between sweethearts and friends, as well as other little fraktur-style drawings. None of the artwork in this book is particularly elaborate, but mostly just small tokens made by simple folk.

In coming up with new designs, other
sources of inspiration are also required…

(My art kiddos have asked about those little dishes of
chocolate chips hanging around the art room!)

And when the internal balance between visual references, doodling, coffee (or tea), and chocolate has reached the appropriate settings, I’ll start sketching. I start with a piece of paper cut to the size I need for the frame I want to use. I was trying to use two 6″ x 7″ frames that I had “ready-to-go,” so these cuttings are 4 & 1/2″ x 5 1/2″. However, there is actually a “historically correct” size that these little tokens should be! In the 18th and 19th centuries, “standard” sheets of paper were usually 13″ x 16″. Fraktur makers used either full sheets, half sheets, quarter sheets or eighth sheets to do artwork on, getting their finished size by simply carefully folding and tearing the paper. These tiny tokens were usually done on an eighth of a sheet of paper.

I almost always start my sketches from the outside in, establishing my borders by measuring carefully. Did you know there’s a correct way to make a square or rectangle? After years of being a frustrated young artist, I learned a few technical drawing skills in a college cartography class. Drawing “square” was one of them… Maybe that would make a Really Helpful Upcoming Post!

This will be the back of the papercutting. I have to keep reminding myself that everything will be backward on the finished piece. My originals will also get pretty smudgy from all the graphite dust, but it’s a necessary evil to designing. I keep trying to sketch on my Wacom tablet or my iPad, and I’m starting to get the hang of it, but there’s nothing like a real pencil and a kneaded eraser! Once I have the sketch close to how I want it, I start cutting…

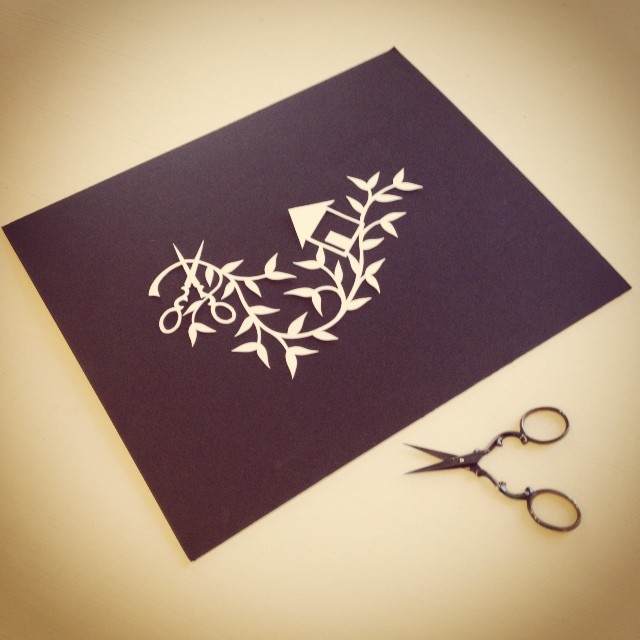
I use a rubber-coated X-Acto knife with #11 blades. Any sort of padding or rubber on the handle is a HUGE help when doing lots of papercutting. Hand fatigue happens very quickly without it. I also go through blades like crazy… I cut mostly with the very tip edge of the blade, and curvy designs seem to snap them pretty quickly. Buy them in bulk! My knife… or my pair of scissors… are sort of like a second pencil to me. That’s what I use to straighten out my sketch lines and create the final design.

Once I have the original cut, I make a copy of it and use the copy to make a pattern for duplicate cuttings. As you can see, this is a relatively simple design… much of the artwork will be added in the painting process. But first, I’ll stain it to add some age. I make a strong solution of instant coffee and boiling water, and apply it to the papercutting with a natural sponge.

I’ll actually soak up the excess coffee with the sponge so the paper isn’t sitting in puddles of water. I let the paper dry naturally (Usually… sometimes impatience gets the best of me!) and then iron it between two sheets of white paper to smooth out any wrinkles. Here are the two new Valentine designs once they are stained…

And… although I had every intention of showing the painting and inking process, I got into painting and forgot to take pictures. So, here’s what they look like AFTER they’re painted…

I went with rather bright colors on these, which believe it or not, is quite true to history. The Pennsylvania Germans LOVED color. The colors in most of the antique artworks we see today have lost a lot of their original vibrancy due to sunlight and time. So I sort of compromise a bit… adding staining to make them look old, but also pumping up the color to make them look new. Artistic license.

Once they’re framed, they look like this…

I should be adding them to our shop’s Sweet Remembrances page very soon… Keep an eye out for them! We’re going to make a limited supply of each for this year due to time constraints, so if you need one let me know!

A Proper Visage…

I’ve been filling silhouette orders, and one that I’ve snipped away at the past couple of days was…

A Proper Visage
(Available on our Traditional Silhouettes page!)

… And I thought that maybe it would be fun to chat a bit about what a “proper visage” is. Or was.

In the colonial period, young ladies were trained to have a proper visage. Your “visage” was your face and upper body… the part of you that might be painted in a portrait. And it was proper to keep your visage portrait-like at all times. Ladies’ faces were to be serene and have a pleasant expression. Anything that might spoil your visage, like a sour expression, was discouraged. Even your shoulders and arms were to be kept in a lady-like position, and the cut of colonial gowns helped maintain proper form, as it was difficult to raise one’s arms in a properly fitted shortgown.

The idea of maintaining a proper visage even extended to the musical instruments a lady was allowed to play. Woodwinds were definitely out, because they caused a lady’s cheeks to puff out while she was playing. And no violins either… it was considered vulgar to see a lady with her arms raised, and elbows pointed out in an awkward position. (In Europe, the Italian composer Vivaldi taught orphan girls to play violin, but they had to perform behind a modesty screen.) Playing the cello was not allowed, also because of the elbows jutting outward, but it was considered proper for ladies to play the viola da gamba, because the bow was held underhanded.

Anyway, I thought that might be an interesting tidbit of information to share with you! We learned about having a proper visage on a trip to Williamsburg when our girls were going through their “American Girls” phase. We had great fun giving them a colonial reminder whenever we saw a cranky face! The thrill did not last long for some unknown reason. I wonder why…

😀

Have a great Friday!

Fall is here!!!

Been working on some fall silhouettes… crinkly leaves on gnarly trees, stacks of punkins, crows, and an old hoot owl on the look-out for a mouse…mounted on aged paper in a distressed black frame.

Harvest Tree Large Silhouette
8 &1/2″ x 13″ Framed Size
$75, plus shipping

About as spooky as I get.

Happy Fall!